> ## Documentation Index
> Fetch the complete documentation index at: https://docs.archetypeai.app/llms.txt
> Use this file to discover all available pages before exploring further.
# RTSP Configuration
> Set up RTSP on Tapo C100 and access it over the Internet
# Set Up RTSP on Tapo C100 and access it over the Internet
This document explains how to set up your Tapo camera as an RTSP stream, accessible by Newton. It follows two steps: first, you set up the Tapo as an RTSP camera, and second, you make the RTSP accessible over the internet.
## 1. Enable RTSP on Tapo C100 and access it locally
Install the Tapo app on your smartphone (Tested on iOS)
Add your Tapo C100 camera to the app following the Tapo instructions
Go to: **Camera Settings → Advanced Settings (little gear on the top right) → Camera Account → Turn it on, and edit Account Information**
Create an RTSP account (username & password)
* This is different from your Tapo app account and will be used for RTSP authentication
* For example: username and password as `testingwithatai` and `testingwithatai`
Go to camera > Device Info > IP Address
## RTSP Stream URLs
You should be able to see your RTSP stream (running locally) in these links:
```bash Main Stream (HD) theme={"system"}
rtsp://USERNAME:PASSWORD@CAMERA_IP:554/stream1
```
```bash Sub Stream (Lower Quality) theme={"system"}
rtsp://USERNAME:PASSWORD@CAMERA_IP:554/stream2
```
For example:
```bash theme={"system"}
rtsp://testingwithatai:testingwithatai@192.168.1.101:554/stream1
```
### Testing the Stream
You can test it locally with VLC: **Media → Open Network Stream → paste the RTSP URL** or go to the browser and pass the link, it'll redirect you to VLC.
## 2. Make the RTSP Stream Accessible Over the Internet via Port Forwarding
This exposes the camera directly to the internet, and the camera has microphone integrated. This is a security risk and should be used just for testing purposes.
### Port Forwarding Setup
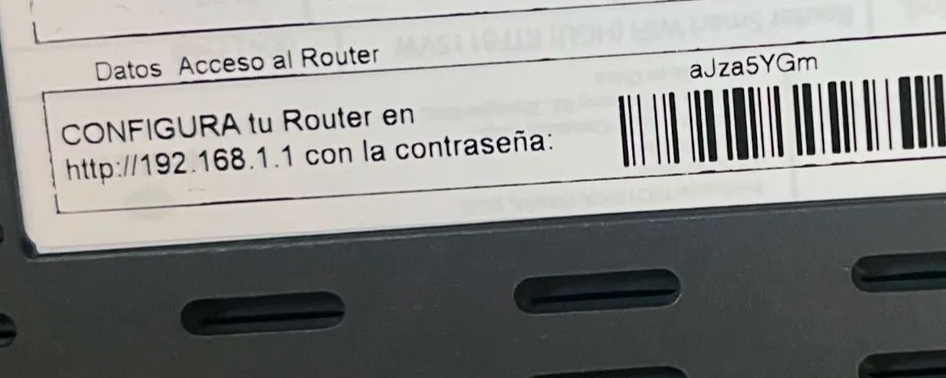
Log in to your router's admin panel (check Router Access Data on your router, it should look like this)
 Go to **Port Forwarding / Virtual Server** settings
Forward **TCP port 554** to the local IP of your camera (e.g., `192.168.1.101`)
Example rule:
* **External Port:** 554
* **Internal Port:** 554
* **Internal IP:** 192.168.1.101
* **Protocol:** TCP
Find your public IP address (Google "what is my IP" or use [whatismyip.com](https://whatismyip.com))
Access the stream externally using:
```bash theme={"system"}
rtsp://USERNAME:PASSWORD@PUBLIC_IP:554/stream1
```
### Example External URL
For example:
```bash theme={"system"}
rtsp://testingwithatai:testingwithatai@79.158.9.105:554/stream2
```
Replace `79.158.9.105` with your actual public IP address, and use your actual RTSP credentials.
## Security Considerations
**Important Security Notes:**
* Port forwarding exposes your camera directly to the internet
* The camera not only streams images, but also sound
Go to **Port Forwarding / Virtual Server** settings
Forward **TCP port 554** to the local IP of your camera (e.g., `192.168.1.101`)
Example rule:
* **External Port:** 554
* **Internal Port:** 554
* **Internal IP:** 192.168.1.101
* **Protocol:** TCP
Find your public IP address (Google "what is my IP" or use [whatismyip.com](https://whatismyip.com))
Access the stream externally using:
```bash theme={"system"}
rtsp://USERNAME:PASSWORD@PUBLIC_IP:554/stream1
```
### Example External URL
For example:
```bash theme={"system"}
rtsp://testingwithatai:testingwithatai@79.158.9.105:554/stream2
```
Replace `79.158.9.105` with your actual public IP address, and use your actual RTSP credentials.
## Security Considerations
**Important Security Notes:**
* Port forwarding exposes your camera directly to the internet
* The camera not only streams images, but also sound