

Creating a Batch Processing Job
To create a batch processing job, click the Create button at the top-right of the Batch Manager dashboard. This opens the Create Batch Job modal: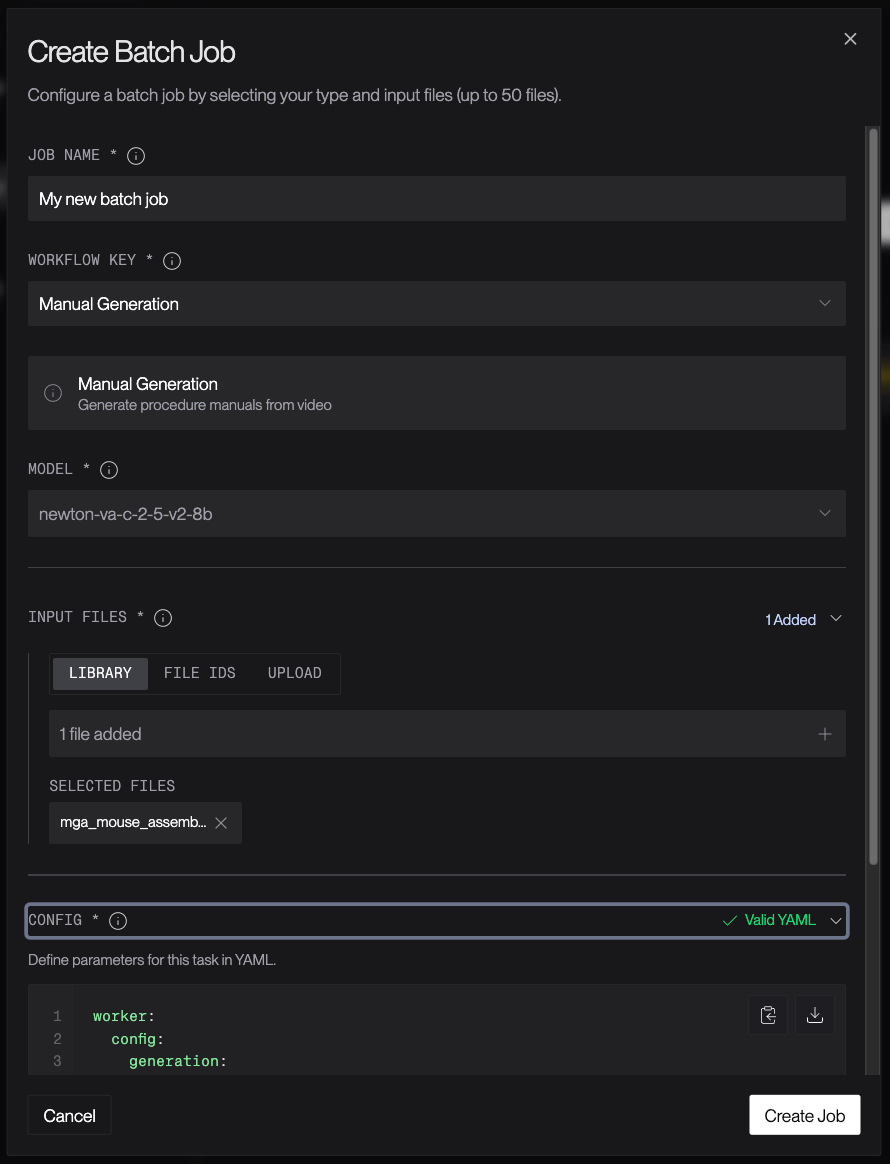
1
Give the job a name
Enter a human-readable name for the new batch processing job.
2
Choose the workflow key for the new job.
This specifies the type of processing you want to do.
3
Select the model to use
Which models are available depends on which workflow key you choose. For example, Manual
Generation jobs use a Newton C model, while Machine State Classification jobs use a Newton
Omega model.
4
Specify custom checkpoint, if applicable
If you selected Custom Checkpoint under Model, you are then also prompted to enter
the checkpoint ID of the checkpoint for your fine-tuned model. See
Fine-Tuning for details on creating fine-tuned models.
Make sure to use a fine-tuned model that corresponds to the workflow key you selected.
5
Specify input files
Select or upload the files to run the job against. You can select up to 50 files.
6
Specify N-shot examples, if applicable
For the Machine State Classification workflow, select N-shot example files to train with.
Be sure to add appropriate labels for each.
7
Specify the job's configuration
Enter the configuration of the job using YAML. For example, for the Machine State
Classification workflow, make sure the column names in the YAML configuration match the
names of the columns in your data files.
8
Create the job
When everything’s configured the way you want it, click Create Job.
Viewing the Status of a Batch Processing Job
To view status information about a job, such as its progress, its logs, and other job details, click on the job in the Batch Manager dashboard. The job status page displays information about the job, including:- The job’s status (
PENDING,ADMITTED,RUNNING,PAUSED,COMPLETED,INTERRUPTED,FAILED,PREEMPTED, orCANCELLED) - The amount of time the job has spent running
- The total amount of time the job has spent in the queue
- The job’s ID
- The job’s workflow key
- When the job was created
- When the job started running
- The YAML configuration of the job
- Processing details about the job
- Logs shows detailed logs for the batch processing job.
- Artifacts lists all of the artifacts generated by the job.
- Input Files lists the input files provided when the job was started.
- Config displays the job’s configuration.
Downloading Batch Artifacts
To download the artifacts generated by completed jobs, you have two options:- To download all of the artifacts for a batch at once, click the Download Artifacts button to the right of the job title. This will download a Zip archive containing all the artifact files.
- To download the artifact file for a specific job, click the download icon at the right side of that artifact’s row in the Job Artifacts view.